NATURAL FARMING

Natural Farming Livestock

Natural farminglivestock promotes a low cost, high profit method that focuses on respecting an animal’s natural
behavioral needs.It is designed to enable animals to carry out core natural behavior within a real world
environment even though they are raised in pens.

Pig Housing Design

In Natural Farming, the basic structure of the pig housing is the same as the chicken housing. The Natural Farming housing is different from traditional animal houses.

GET IN TOUCH

Natural Farming PROGRESS

under construction...

Samples of piggery houses:

Pig House Design

The main purpose of the housing design is to improve air flow and ventilation. There are 5 things to remember about the design of the livestock housing:

1. High roof and opening in top allow for good airflow and to protect bedding from rain. Cold air comes in the sides of the building, the sun heats up the air and draws hot air up to the roof and escapes out the gap.

  • Higher North portion of roof is 2/3 the width of building. It should overlap over the lower portion so rain will not come into the opening.
  • Lower South portion of roof is 1/3 of the width of building.
  • Height of opening should be from 0.5 meter, with opening on South roof at 1meter.

2. The building length must be East-West to give enough sunshine inside the pen.

3. The North to South width of building is a maximum of 9 meters. Each pig requires around 1.5m2 of space.

4. The height of the wall around the sides of building should be 2.5 meters high:

  • Can be made of local materials like bamboo or wooden poles or cement blocks and steel pipes, but use whatever is available and practical.
  • The sides should also have curtains that can be rolled up.

5. The location of the housing should:

  • Be in an open, windy area so wind can pass through
  • Be flood free
  • Have easy access to grass and plants

The most common problem in warm climates is that housing becomes too hot and this can stress the pigs. This design and an appropriate location will control the temperature and keep the bedding dry:

  • When the sun shines, the pen can become very hot. Hot air will rise and go out the top.
  • When cold air comes in from the sides, it sucks out all the moisture from the floor and rises up with the hot air.

You may add a sunroof (1 meter of clear, heat-resistant plastic on the lower roof before the overlap) to allow more direct sunlight on the floor. You can also add a waddling pool to help pigs cool down. The pool should be partially inside for shade, and partially outside for cleaning.

12.B Pig Bedding

Pigs naturally like to root, dig and roll in dirt. They need space and bedding that will allow them to do this without risk of disease or injury. Natural Farming uses deep bedding for pigs.

PART A

1. Dig down 1 meter to make room for the bedding. Every pig needs 1.5-2 m2 of space.

2. Make the bedding mixture with these amounts:

  • Bottom 1/3 of the bedding should be logs, small branches, etc.
  • Middle 1/3 of the bedding should be corncobs or cocochoir without the fiber (pigs will eat the fibre, which fills up their digestive system, making them sick or unable to process food), or small twigs, etc.
  • Top 1/3 of the bedding is a mixture of organic material (any kind of saw dust, wood chips, carbonized rice hull or dried leaves), dirt, and sea salt. The ratio for 1.5m2 space at 35cm height (for one pig) is:
    • 6 sacks (roughly 400kg for 0.5m3) of saw dust, wood chips, carbonized rice hull, and/or dried leaves (do not use regular rice hull because once it decomposes, the silica in the rice hull makes the pigs sick.)
    • 3 sacks (~ 225kg) of garden soil
    • 0.75 kg sea salt
    • 0.75 L IMO2 (optional: add some FPJ & FFJ)

3. Make a concoction spray of beneficial micro-organisms to increase the growth of Indigenous Micro-Organisms (IMO2) in the bedding. Since pigs eat soil, they will also eat the micro-organisms, this helps control the odor of their feces. Mix 1 L of IMO2/ LABS (0.8 L of IMO2 and 0.2 L LABS) in 100 L of water. Spray once a week for one month before putting pigs in.

4. Maintenance of Pig Pen

  • NO WATER is used to clean the pens!
  • Use the same IMO2 with LABS mix with water to spray on bedding to control odor if needed.
  • Bedding does NOT need to be removed and replaced. It can last for ten years.After six months, you can take some of the top layer to use for fertilizer, but do not take a lot of it. Whatever volume you take out, replace with the same ratio of bedding mixture as instructed above.
  • Bedding will pack down so add extra bedding when needed.
  • Pigs will feed on the fermented excretion and they like to dig and have a soil bath. This will accomplish two things:
    • It helps them to have no skin diseases.
    • Micro-organism and pigs will establish a cooperative relationship.

Here are some of the benefits that others have seen from using this method of housing and bedding:

  • 1. Reduces costs by 40% (reduce labor, less medicine, less water, etc.)
  • 2. No need to clean, wash or store manure.
  • 3. No smell, no noise pollution and better health.
  • 4. Provides a healthier environment for the pigs, which means healthier pigs, which means healthier meat to eat and sell.
  • 5. A typical pen operated under this system can convert about 30 m3 of pig waste into 20 m3 of valuable compost annually.

12.C Purchasing Pigletsand Making Changes Slowly

To start raising pigs, it is best to purchase piglets for fattening from conventional farms. Remember these four things when purchasing piglets:

1. Buy from respected breeders that sell high quality breeds.

2. It is best to wait until the piglet is at least 45 days old.

3. Make sure the piglet is vaccinated for pig cholera and is dewormed and male pigs are castrated.

4. Clarify what kind of feed is being used for piglet at the time of purchase.

In general, pigs are not selective about what they eat. They will eat almost anything. This does not mean that what we feed them is not important. When we feed pigs the right things, they will be healthier and it will make better quality pork products.
But transitioning to the Natural Farming feed should be slow. A helpful tool to know before making this transition is knowing how to estimate your pig’s weight.

Estimating Your Pig’s Weight

Healthy piglets will grow bigger naturally. Usually, a farmer can guess how much a piglet is growing, but there are ways to measure a pig to estimate its weight. This procedure is reported to be accurate of 97%.

Measure heart girth in meters (around of the body at the chest immediately behind the forelegs.) Measure length in meters of the body along the arch of the back from the point midway between the ears to the base of the tail.
Heart Girth: Measure the circumference just behind the forelegs. Length: Measure from the base of the ear to the base of the tail.

Multiply the heart girth X heart girth =Girth result

Multiply the Girth result X Length X 69.3 =Weight of Pig

For example:Heart Girth = 1.27 meters, Length = 1.02 meters

1.27 x 1.27 = 1.6129, then 1.6129 x 1.02 x 69.3 = 114kg is the weight of the pig

After the pig is 45 days old, you can begin the 4 weeks phase out process.

Four Weeks Pig Feed Phase-Out Process

12.D Nutritive Cycle for Pigs

The nutritive cycle relates to the development of plants. Plants need different nutrients at the three different stages of growth. This principle is also true for pigs. This means that the type of feed needs to be changed to meet the specific needs at the different stages of growth for a pig. Pigs need protein when they are young, phosphoric acid during adolescence, and calcium after maturity. The amount of food they need will also change. This gives them what they need at the right time, age, and quantity. This improves their health and ability to grow, mate and raise piglets.

There are six specific stages to consider in the life of a pig:

1. Piglets that have been weaned (up to 2 months old)

2. Piglets that are 2-4 months old are called Growers

3. Piglets that are getting ready to be pregnant around 4-6 months old are called Gilts

4. Sows that are pregnant

5. Sows that are breast feeding her new piglets

6. Sows that are ready for mating

To make feed for pigs is not difficult. It is healthier and cheaper than using commercial feed. Just recognize there are specific nutritional needs for each stage of development of the pig.

Summary of What Pig Feed To Use and How Much
Sno Age Type of Feed Amount of Feed
1. Piglets weaned to 2 months old Booster Feed (PBF) 100g/piglet/day
2. Growers 2 – 4 months old Grower Feed (PGrF) 1.7kg/pig/day
3. Gilt before pregnancy (4-6 months) Gilt Feed (PGiF) 2kg/pig/day
4. Sows during pregnancy Gestating Feed (PRP1) 2.5kg/pig/day
5. Sows while breast feeding Lactating Feed (PRP2) 3kg/pig/day
6. Sows after breast feeding and mating Gestating Feed (PRP1) 2.5kg/day

The cost of feed in raising pigs the conventional way is about 60% of the total expenses. In NF, it can be reduced to 40% or less. For example, in Thailand, it takes 330kg of total feed to get the pig to about 105kg weight. In NF, it would only require about 230-270kg of feed. This is because in the conventional farming method, 50% of the feed is not digested and becomes manure, whereas in NF, 70-80% of the feed is digested and only 20-30% is wasted. Another reason why NF is more efficient is because once the 20-30% manure becomes part of the composting bedding, full of good microbes, the pigs eat it up again, which enables them to eat less as they absorb the nutrients better.

Pigs should be fed only once a day, using the feed, 2 hours before the sun goes down. In the morning, they will be given fresh cut vegetables around 9:30am. During the day, they can root and eat the bedding, which should resemble a compost pile, containing manure with undigested food, and also soil and sand particles.

12.E Natural Farming Feed

Natural Farming Feed was developed in Japan using the fermented organic material of different plants and other high protein plants. This is 100% edible for pigs. The feed has no antibiotics, no animal-by-products and no growth hormones. For adult pigs, a home-made feed mix can contain fresh local plants, fermented plants and plant juice, agricultural waste, rice straw, soil, decayed leaves, and local micro-organisms. The main ingredient of the fermented plant source is fresh local plants such as banana stalk, water morning glory, green papaya fruit, and weeds.

The dry ingredients is about the same for the different stages of the pigs, but the wet ingredients is different.

Pig Feed Formula

Ingredients Formula
Pig Booster (PBF) Pig Grower (PGrF) Pig Gilt (PGiF) Pig Gestating (PRP1) Pig Lactating (PRP2)
Dry Ingredients (in kilograms)
Rice Bran (D1) 2.5 25 25 25 25
Ground Corn 1.25 12.5 12.5 12.5 12.5
Copra meal * 0.75 7.5 7.5 7.5 7.5
Fermented Coconut meat ** 0.5 5 5 5 5
Termite soil *** 0.13 1.25 1.25 1.25 1.25
Salt 0.1 1 1 1 1
Coconut shell charcoal 0.1 1 1 1 1
Skim milk powder 0.75
Total Weight 6.08 53.25 53.25 53.25 53.25
Wet Ingredients (in milliliters)
FPJ (high protein) 100 1,000 1,000 1,000 1,000
FPJ (multi-vitamins) 63 625 625 625 625
FPJ (medicinal) 38 375 375 375 375
FAA/KAA 125 1,250 1,250 750 1,250
FFJ 75 750 750 1,250 5000
LABS 50 500 500 500 500
OHN 50 500 500 500 500
CaPO4 1,250
Ca 1,250
Total Volume 500 5,000 6,250 5,000 10,250
Instructions

1. First, mix all wet ingredients together.

2. Then mix wet ingredients with only 10 kg of rice brand first, making sure it is evenly mixed and there are no lumps.

3. Mix the remaining wet ingredients and dry ingredients into the mixture.

4. Store in a large plastic bag (close bag with tie and leave only a little bit of air in the bag) or a large container with a lid.

5. Let ferment for3 days before feeding to pigs.

* Can store in dry cool place sealed well without air in it for 1 month.

Notes
Age of pig: Weaned to 2 months old 2 - 4 months old for female pigs to be reproduced; 2 months until slaughter or sold for male pigs 4-6 months old female pigs preparing for mating Pregnant female pig Mother pig breast feeding her piglets
Amount to feed (per pig per day) 100-500g 1.7kg 2kg 2.5kg 3kg
Will feed 1 pig for approximately this many days (you will need to multiply the formula by the ratio of the number of pigs you are raising): 12-60 32 26 22 18
* Copra meal = dried coconut meat
** Fermented coconut meat = the squeezed coconut meat from making VCO is fermented for 2-3 days.
*** Termite soil - use healthy garden soil or 1 month old compost pile or IMO-5 if no termite soil is available.

Additional care:

  • Make fibrous chewing material for the pig to snack on once in a while such as, after meals to help them relax or encourage them to eat more. Use fibrous or woody plants such as papaya, carrots, cabbages, corn stalks, or other stubble. Cut the materials in pieces, soak them in 10 L of clean water, add 250ml of pig beverage (see water section) and 250g of brown sugar (250ml molasses). Cover the container for 15 days. Give it to the pigs as snack or dessert ever so often.
  • Eating green grass helps piglets to have strong intestines and a healthy digestive system. This makes a healthy pig. If you give them high calorie, high protein, soft food, the pigs will not develop strong digestive systems. Because of this, conventional farming produces big fat pigs that are so weak that they cannot digest 50% of what they eat.
  • If your piglets are raised in the NF sytem, they will already be eathing fresh green vegetables in the morning with their moms. If you do this, you will need less money for commercial feeds. NOTE: Do not feed pregnant pigs eggplant, pineapple, snap beans or long beans! These plants create gas and indigestion for the pigs.
  • You can also give your pigs Fermented coconut meal (FCM) – combine 1kg of sun dried grated coconut meat and 1kg of molasses. Mix well and ferment for 3 days. Add to feeds every 5 or 10 days.
  • Using only commercial feeds is normally avoided because they are low in fiber, sea salt and natural vitamins. But they can be used in small amounts if mixed into a natural feed ratio.

12.F Water and Concoctions for Pigs

Pig Feed Concoctions

TPJ has been covered, but we need to specialize them for the pigs’ dietary needs. There are three types of Fermented Plant Juice concoctions that you will want to make.

Protein rich TPJ - follow TPJ recipe using at least 5 different plants with high protein content plants/leaves. Some examples are rensonii, flemengia, indigofera, trichantera gigantean.

Essential nutrients and minerals TPJ - follow TPJ recipe using a combination of plants rich with essential nutrients and minerals. Some examples are water spinach, sweet potato leaves, moringa leaves, malabar spinach, amaranth leaves, jute mallow, talinum, uray, or other herbs local to your area.

Medicinal TPJ - use the type of plants below for the specific need. Follow TPJ recipe using a combination of plants rich with essential oils.

  • For respiratory system: oregano, Chinese chastetree, banana, sambon
  • For lactation: moringa, lemongrass, chili pepper, green papaya leaves
  • For diarrhea or detoxing: avocado fruit, guava fruit, star apple fruit
  • For de-worming: mimosoidtree leaves, Chinese honeysuckle, betel nut

For each TPJ concoction, can be used after 7 days of fermenting, but you can also ferment it for up to 14 days. The strained liquid can be kept and used for up to 6 months.

  • Make a list of at least 5 different local plants that are high in protein.
  • Make a list of at least 5 different local plants that are rich with nutrients and minerals.
  • Make a list of at least 5 different local plants that are medicinal.

It is a good idea to plant these kinds of plants in your garden 6 months ahead of time. 1,000 square meter can support around 25 pigs, depending on how planting is done.

Other concoctions that are useful for pigs are:

Virgin Coconut Oil (VCO) – Protects the pig’s skin and is good for digestion of proteins. If the pigs have a rash, mix VCO with pounded quickstick (Gliricidia sepium) leaves and rub onto rash area.

Lactic Acid Bacteria Serum (LABS) – For digestion and reducing bad smells. Put into animal feed or spray into the bedding.

Fermented Drinks for Pigs

Water must be available all the time, whenever the pigs want it. Establish a water system where the pigs can take a drink anytime of the day. This keeps the temperature of the pigs’ body at its normal level.

Make sure the waterer and the feeding troughs are separate. They should be opposite from each other so the pigs do not get crowed when they feed and drink. The feeding troughs should vary in size according to the size of the pigs. They can be made of wood or any other materials that are safe and easy to find. Water should shut off or not be available at night so pigs will not drink and they will instead rest.

Add fermented drink to the animal’s drinking water to promote good digestion and to prevent diarrhea.

Pig Whiskey: This is the fermenting of herbal plants to produce plant hormones that reduce stress and helps to keep the pigs quiet and sleep well. This is made with plant ingredients such as: garlic, ginger, galangal (another root in the ginger family), Thai ginseng (Talinum paticulatum), Borapet (Tinospora crispa), Haam (Coscinium fenestratum) and Ma-kwan (Zanthoxylum limonella), etc. Different local herbs can be used such as cinnamon, licorice, and Dong Quai (Angelica sinensis).

  • Method of preparation: It’s like the OHN process. Chop the different plants into small pieces to make 1kg of all materials, then put them in a glass bottle or clay jar. Add 0.5kg of molasses or brown sugar and let it ferment for 3 days. Then add 2 liters of distilled alcohol (local gin or whiskey). Cover the container and leave it to ferment for 10-15 days. Remove the alcohol and store to be used. This can be used for up to 1 year. You can reuse the residue plant materials for 5 more times by adding the same volume of alcohol as before and harvesting every 10-15 days.
  • How to use: Mix 15ml of pig whisky with 10 liters of water and use as their drinking water. Give to pigs daily to promote good digestion and prevent diarrhea. If the floor gets hard, pour this drink on the floor and it will create a nice smell and the pigs will dig up the floor making it loose and creating air spaces to increase micro-organisms activity.
  • Fermented Drink To Treat Diarrhea or Indigestion.

    • Method of Preparation: Mix 30ml of each of these concoctions, pig whiskey, FFJ, LABS, and Ca, called PW+.
    • How to use: Mix 50ml of the PW+ mixture above with 10 liters of water and give to the pigs as their drinking water. Give to pigs only when they have diarrhea or indigestion.

12.G Mating, Pregnancy, Birthing, and Piglet Care

Mating & Pregnancy

1. Natural Farming female pigs can become pregnant at 6 to 7 months old.

  • a. Ideally, the pig should be 90-100kgs.They should not reach 110-150 kg before pregnancy. For the first pregnancy, it is better to use a younger male pig that is not too heavy for the female pig.
  • b. Choose a female pig with these characteristics:
Sound Guilt Not Sound Gilt
Hight tail setting Low tail setting
Proper set to hocks Post legged
Large, even-sized toes Small inside toe
Set to pasterns Straight pasterned
Forearm slope Buck kneed
Moderately long neck Short neck
Sloping shoulder Straight shoulder
Level top and rump High top and steep rump
Adequate depth in stomach middle area Slender stomach in middle area
Long, slender teats properly spaced Inverted teat, short, blunt, thick, undesirable teat quality
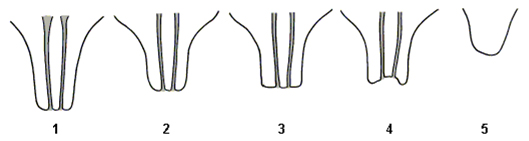
  • c. Choose a female pig that has good teats characteristics. Gilts should possess at least seven evenly spaced teats on either side. Longer thinner teats are better. Piglets have difficulty suckling short teats and as the sow matures the teats increase in size and make the problem worse. Please see the following diagrams for desired teats characteristics:
    • i. The teat formation of # 1, 2, and 3 are functional, with 1 being the best choice. # 4 is inverted and non-functional. And 5 is damaged and non-functional. Hence pigs with teats like #4 and 5 should not be chosen to be mothers.
    • ii. The placement of the teats should parallel to each other and not too far apart so that they are accesible to the piglets when the pig is lying down.
The teats are not located too far to the sides of the pig’s body so that when the pig lays down, the piglets can reach the teats.

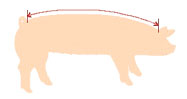
2. Choose a female pig with large vulva, without signs of defects. The vulva is the external female reproductive organs. A normal pig’s vulva looks like an upside down tear drop. Avoid pigs with a vulva that points any direction other than straight down.

3. Choose gilts that have sound legs and feet without any sign of weakness, and toes of even size. Gilts should be wide through the hindquarters with depth and squareness in the body cavity; ribs should be well sprung.

4. A gilt’s temperament is also important. It should be quiet but alert and active. Do not choose flighty or overly aggressive gilts.

5. Young, healthy male pigs should be mated for the first time when they are 8 to 10 months old. It is best to have male pigs that are not from the same genetic pool. It may be easiest to rent a male pig to use for breeding.

6. Female pigs are ready for mating 5 to 7 days after they have weaned their piglets. If they do not get pregnant, they will be ready to mate again in about three weeks (pigs come into heat about every 21-30 days).
It is important to mate the female pig when she is ready. The more times that are missed the weaker the pig gets and the less number of piglets she may have.

  • What are the signs that a female pig is ready to mate?
    (The sow is uneasy and noisy. The tail gets straight. When you put pressure on the back, the ears will go straight. The reproductive area is red. The vulva is red and there may be mucous in the area.)
  • It requires keen observation to see if the female pig is ready for mating. When you notice she is ready, the best time to mate is on the second day (morning and late afternoon). The mating symptoms will last 3 days.

7. Mating time can vary between 5 to 20 minutes.

8. Pregnancy will typically last 115 days (3 months, 3 weeks, 3 days) after conception. They will not show until they are 3 months pregnant (pot bellied and round in the middle.) There are a few hints to determine if she is pregnant or not. 1) Monitor her heat cycle. If she is pregnant, then she shouldn’t come back into heat. 2) Another possible sign is when a pig is pregnant, the vulva tip may gradually rotate and point up. This isn’t a 100% accurate test and can vary among individual pigs. The logic is that if there are piglets inside her, as the piglets get larger and weigh more, they start to pull on the pig’s reproductive tract, which pulls on the pig’s vulva, causing it to tip up.

9. Normally, female pigs can give birth to about 10 to 12 piglets twice a year for 4-5 years. NF pigs could give birth between 14-18 piglets.

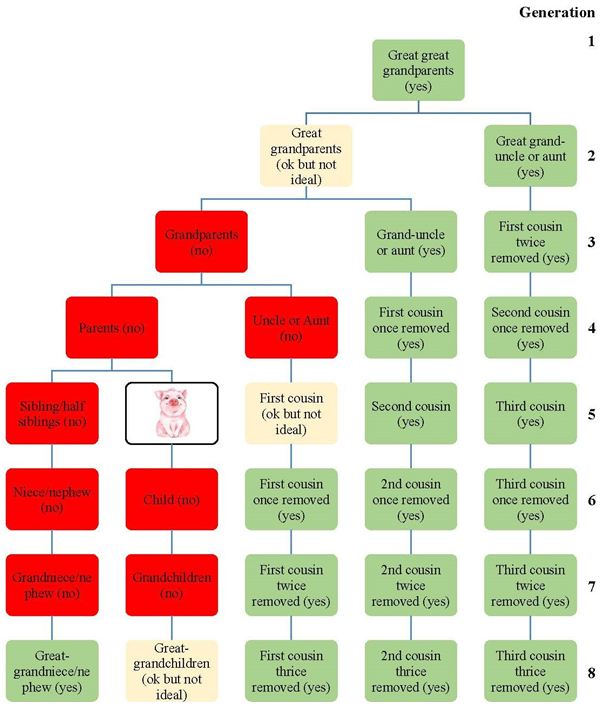
10. Choosing the right mate for your pig is very important because inbreeding causes the pigs to be unhealthy and less productive. It may be easier for one family in a community to raise healthy male boars for breeding and different families to raise sows and piglets. It takes different specialized skills to raise boars and sows.Generally, the closest relationship should be 4 generations in the direct lineage (great grandparent to great grandchild) or first cousins in non-linear relationships. But the further the relationship the better. Below is a chart showing which relationships can be bred (green), which is acceptable but not ideal (yellow), and which is an absolute no (red). So you will need to make sure you track your pigs in order not to accidentally inbreed them. If you will be outsourcing, make sure to ask the breeder for the lineage also to make sure inbreeding doesn’t take place.

Breeding Relationship Chart

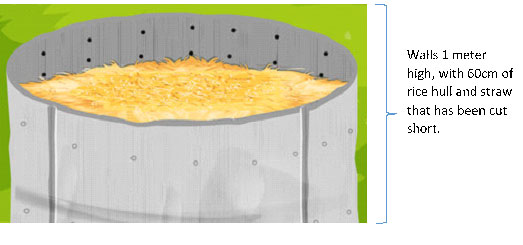
1. The size of the birthing pen should be about 3m x 4m for every sow.

2. Make sure the floor in the birthing pen isn’t too soft that the piglets get crushed by their mother accidentally.

3. The birthing process, called farrowing, takes anywhere from 3 to 8 hours. First time mothers may take longer than experienced mothers.

  • a. When the sow is getting ready to give birth, she will lay on her side. Right before a piglet is born, she will raise her leg up and may twitch her tail.Usually the first piglet is born and then there is a wait before the second piglet comes.This pause in births can be as much as an hour. After the second piglet, the births usually happen pretty quickly.
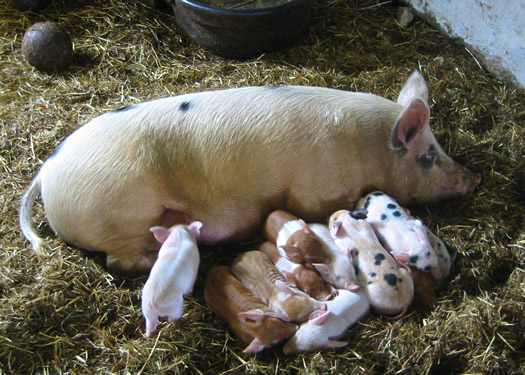
  • b. When the piglets come out, observe but do not handle the piglets right away. The piglet’s first contact should be with its mother. If a piglet smells your hand first, it will think you are the mother, or the source of food, and they will get confused, searching for you instead of its mother. Once the piglet has found its mother’s nipples, if you need to handle the piglet for some reason, then you may. If there are health issues that requires you to interfer and handle the piglet, afterward, help the piglet to suck on one of the sow’s nipples before you leave.
  • c. The first few pigs are usually born headfirst. The piglets born later in the litter may be born backwards. This is normal and not an emergency.
  • d. The sow is most likely done when she acts peaceful, isn’t shivering or acting uncomfortable. She will begin talking to the piglets. After the piglets are all born, she will pass the placenta. The placenta usually takes 1 to 4 hours to be passed.
  • e. You need to monitor the sow closely the first 24 hours after farrowing. Make sure that she isn’t showing signs of infection.
  • f. She will have bloody discharge for a few days, which is normal and expected. As long as she is eating, acting normal and comfortable, then she is most likely fine.
  • g. Occasionally a piglet will be born not breathing.This is commonly due to mucous in the nose. You can take a small piece of string or straw and tickle inside the nose to make the piglet sneeze or cough.This will remove the mucous, allowing the piglet to breathe. If the piglet isn’t breathing and doesn’t have a pulse, it may be stillborn. Make a note for future litters.

4. Day 2 – cut the sharp teeth (usually 4 teeth) of the piglets so they don’t bit the sow’s nipples.

5. By this time, you should be able to observe whether the sow might be “a careless mother”, one that does not watch how it gets up or lay down among her piglets and ends up accidentally suffocating a piglet. In this case, you may have to cage her in a way that the piglets can still come to her for milk, but will not be crushed by her.

6. Day 3 – give piglets an injection of iron vitamins.

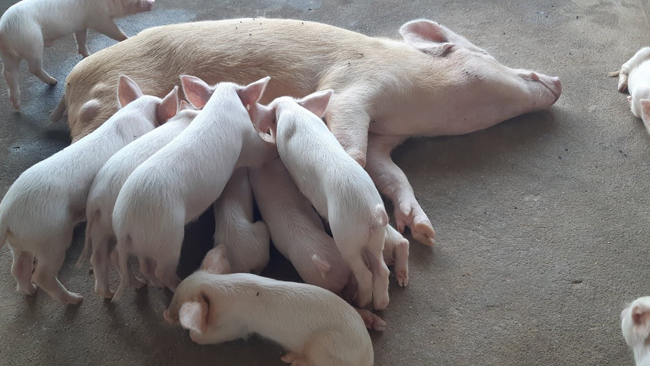
7. The piglets will be dependent on the mother’s milk for the first 10-14 days, so make sure the sows are getting good quality feed so she will produce good milk. Continue to give her fresh vegetable cuttings in the morning, especially moringa, and it is best not to feed her eggplant, pineapple, snap beans or long beans! These plants create gas and indigestion for the pigs. Feed her at 4pm using the Feed Lactating Formula (RP2). You may adjust the quantity as needed.

8. Around 14 days old, castrate male piglets that you will be raising for meat.

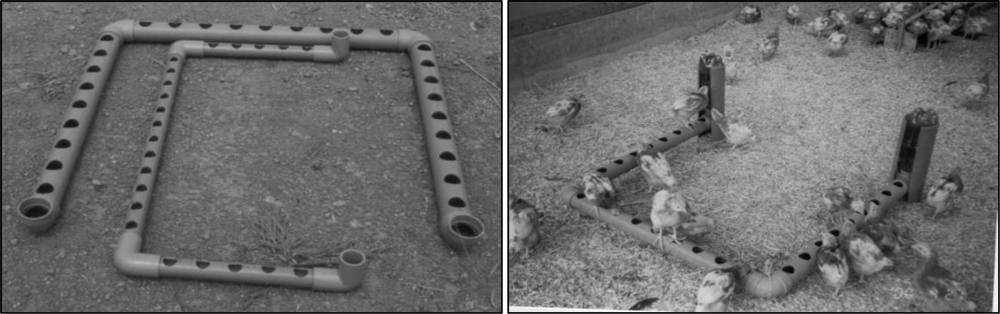
9. Day 19 - start encouraging the piglets to feed on fresh soft vegetables mixed with the soil from the pen so the piglet’s intestines will be strengthened; and in the afternoon, when you are feeding the sows, feed the piglet the Pig Booster Feed (PBF) formula to start encouraging the piglets to start the weaning process.

10. After 25 days, introduce more high protein plants.

11. At 35 days, encourage the piglets to eat more of the feed than breast feeding by separating the sows and the piglets during scheduled meal time.

12. Day 40 – start introducing them to the bigger pen with the larger pigs, a little bit each day.

13. At 45 days, you may separate the piglets from their mothers. Introduce a little calcium and calcium phosphate to the piglets’ food and/or drink to help their bones grow strong. Do not wean them earlier than 45 days.

13.A Introduction to Natural Farming for Chickens

In the market, most of the chickens we find have chemicals and hormones injected in the meat, especially estrogen. This is why the commercial broiler chicken in the market has thick white meat. The chemicals the chickens are pumped with stay inside the meat of the chicken, so when humans eat the meat, the chemicals get passed to us and we develop health problems from it, such as too much estrogen changes the chemical makeup in our bodies.(https://nutritionfacts.org/2016/09/13/estrogen-animal-products/)

This is what happens to our bodies when we get too much estrogen:

Too much estrogen in men Too much estrogen in women

• Infertility

• Gynecomastia (large breasts)

• Erectile dysfunction (ED)

• Lower urinary tract symptoms associated with benign prostatic hyperplasisa (BPH)

• Increased abdominal fat

• Feeling tired

• Loss of muscle mass

• Emotional disturbances, especially depression

• Type 2 diabetes

• Bloating

• Swelling and tenderness in breasts

• Fibrocystic lumps in breasts

• Decreased sex drive

• Irregular menstrual periods

• Increased symptoms of premenstrual syndrome (PMS)

• Mood swings

• Headaches

• Anxiety and panic attacks

• Weight gain

• Hair loss

• Cold hands or feet

• Trouble sleeping

• Sleepiness or fatigue

• Memory problems

Source: https://www.healthline.com/health/high-estrogen#complications, and https://universityhealthnews.com/daily/aging-independence/8-surprising-high-estrogen-symptoms-in-men/

Bird flu is another major problem present in raising commercial chickens. The modified hybrid chicken is more likely to get a disease. Have you experienced a time when all the chickens in the community have died?

Now let’s compare this to the Natural Farming method.

The floor is made of straw and dirt. It is not concrete. This helps to break down the manure and keep the area from smelling. In Natural Farming, we do not have to clean up all the manure. The dirt is also good for the chickens to eat.
Poultry farms use concrete floors and they feed the chicken antibiotics and hormones to keep them healthy rather than using natural dirt and the micro-organisms present to keep them healthy.

Picture 2

Natural Farming does not heat with machines. It uses the natural heat from fermenting compost to keep the chicks warm. This is generally the same temperature of the mother hen without needing artificial heat lights.

Picture 3

Baby chicks need to eat broken brown rice grains for three days after they hatch. This will help their digestive systems develop. Fresh, small bamboo leaves will also help to strengthen their intestines.The Korean Natural Farming Association suggests that by using brown rice, the rate of egg-laying can increase by 25% and remain high for 3 years.

You can use broken white rice IF you know it has not been sprayed with chemicals. This is why it is good to plant rice on your own farm.

The three pictures above represent the main Natural Farming principles for raising chickens that we will learn. God has given us good ways to raise chickens and we should use them!

As with raising pigs, chickens can also be very noisy, messy and can smell bad. But we have learned how to deal with that with pigs, we will also apply the same principles for chickens.

The chart below is a quick comparison between raising chickens the commercial way compared to raising them the Natural Farming way:

Natural Farming Commercial
Chicks Buy when strong enough to move on their own, or hatch our own. Buy hatched
Starting Feed Broken brown rice & freshly cut young bamboo leaves for 1-3 days old Commercial feed
Housing Natural material with good ventilation Caged housing, very tight space
Flooring/bedding 7 cm deep of 3 cm length straw on top of dirt floor Usually metal or concrete
Heating/brooder box Using natural composting process to keep chicks warm Artificial light/lamps
Habitat/Environment Inside at night, free range during the day. Always inside
Feed/water Adding concoctions for bird’s health Much chemicals
Vaccination Yes, for new NF farms but no after time Yes, lots
Hormones and antibiotics No Yes
Time it takes for mature for market 60-75 days 28 days(not natural)

Because the chickens raised using natural methods, they do not have all the hormones and chemicals that are harmful to humans when we consume the chicken meat.

13.B Chicken Houses& Bedding

Chicken houses have similar designs to the pig houses.

Wind removes moisture; the floor is dry

You can use what you have for free range chicken houses and consider some ways to improve their housing. The design of these houses intentionally provides sunshine, space and good air flow to protect the animals from the weather and to keep the floor dry. Side walls can be made from netting or curtains to block excess sun, wind or rain. The important thing is to have a design and location that will provide the best possible environment to raise the chickens.

There are some additional specifics to know about chicken houses.

1. For chickens raised for meat, you will need roughly 0.1m2(1,000cm2) of shaded area per chicken. For layers, you will need 0.15m2 (roughly 1,500cm2) of shaded area per chicken.

2. The sides of the walls have netting to keep the chickens inside the area.

3. Chicken perch: chickens like to sit on perches when they sleep. They like to be together so there needs to be enough space for many birds. Perches should have different heights so that chickens do not crowd together too closely.

4. Nesting boxes for layers will be discussed later.

5. Brooder boxes are used for new baby chicks will be discussed later.

Chicken Bedding

One big problem with raising chickens is the smell. The bad smell comes from the nitrogen in the feces. That is why in NF, we make the floor of the chicken house from dirt with rice straw. The rice straw should be about 3 cm long and spread on the floor 7 cm deep. Micro-organisms in the straw will feed on the feces and will break down the nitrogen. That is why there is no smell with Natural Farming chickens.

It also helps to have some sun on the floor. As the angle of the sunlight changes, the light moves across the floor. The sun controls the bad micro-organisms from growing and help to decompose the bedding. This way, feces do not pile up.

As the straw decomposes, you will need to add more rice straw. The floor will only need to be cleaned every 3-5 years. In fact, the older the floor gets, the better the chickens grow. The composting floor can become a food source for the chickens, and over time, the farmer can also use the floor as fertilizer for plants.

If there are enough FPJ & LABS to make the bedding attractive to the chickens, the floor will become 7-10% of their total diet. In Korea, it has been found that egg-laying chickens will keep producing eggs for twice as long as normal on this diet.

13.C Purchasing Chicks& Brooder Crib

Once you have the chicken house and the bedding ready, you can start purchasing chickens to raise. If you will start with chicks, make sure you:

1. Purchase a batch of chicks from a respected hatchery or from someone that his healthy hens and roosters and is known to provide good quality chicks.

2. Buy them at 1-3 days old.

3. Start feeding them broken brown rice kernels and fresh chopped bamboo leaves right away. This will help expand their intestines and help them digest their food better.

4. House them in a brooder crib.

Brooder Crib (Box)

LARGE GROUP DISCUSSION

Chicks are separated from their mothers right away, but they need a way to stay warm and safe. Brooder boxes will allow for that. There are many different ways to make brooder boxes. The Natural Farming method, originally taught by Dr. Cho from Korea has his way, you may download the information using this link: https://naturalfarminghawaii.net/wp-content/uploads/2013/09/Natural-Farming-Poultry.pdf

Experienced Natural Farming farmers in the Philippines have created an easier way that is appropriate for the tropics:

  • It does not matter if the outside temperature is below 20oC. Natural Farming chicks are raised utilizing their body heat as heat, along with natural heat from fermentation and composting. The temperature will be hotter at first but will go down as the chicks grow. They need 33oC when they are young and can tolerate cooler temperatures as they get older.
  • When chicks are cold, they naturally develop short and dense hair to withstand the cold. If you give artificial heating, they will develop long thin hair, which doesn’t resist cold well. So when they get cold, these weak chicks gather in a corner for warmth and the one in the crevice of the corner tends to get crushed to death. So our brooder crib are round.
  • Brooder crib should have enough space so the chicks can run back and forth for exercise.

The Design:

1) The diameter of the brooder crib is up to you, but remember that you might need to reach into the middle section to do something. For every chick, provide 400cm2 of space. So if you want to have 100 chicks, you will need 2.25m diameter crib (ideally sheet metal is 1m width and 7.1m in length.)

2) The brooder crib should have a mosquito net around the whole crib to protect the chicks from mosquitoes. Especially do not open the net after 4pm when the mosquitos are most active.

3) Seal the whole house at night and open to sunlight and air during the day time.

13.D Feed for Chickens

If chicks are born into the Natural Farming system:

  • Start the chicks that will be used for meat on bamboo leaves and brown rice 1 day after hatching.
  • Start chicks that will be used for laying eggs on bamboo and brown rice 3 days after hatching.

Natural Farming Chicken Feed formulas are very similar to Pig Feed Formulas.

Summary of Chicken Feed Use
Age Type of Feed How much
1-3 days old Broken brown rice & chopped bamboo leaves All they can eat
4-14 days old Chicken Booster Formula (CBF) 25 g/chicken/day
15-30 days old Chicken Grower Formula (CGrF) 50-75 g/chicken/day
15-30 days old Chicken Layer Formula (CLF) 50-75 g/chicken/day
30-60 days old Chicken Grower Formula (CGrF) 75-150 g/chicken/day
30-60 days old Chicken Layer Formula (CLF) 75-150 g/chicken/day
Note: Chickens should be fed only once a day, 2 hours before the sun goes down. During the day, they can scratch for their own food on the floor, which should resemble a compost pile, containing manure with undigested food, and also soil and sand particles.
Ingredients Chicken Booster Formula (CBF) Chicken Grower Formula (CGrF) Chicken Layer Formula (CLF)
Dry Ingredients (in kilograms (kg))
Rice Bran (D1) 2.5 7.5 12.5 7.5 12.5
Ground Corn 5 15 25 15 25
Copra meal * 1.5 4.5 7.5 4.5 7.5
Fermented Coconut meat ** 1 3 5 3 5
Termite soil *** 0.25 0.75 1.25 0.75 1.25
Salt 0.2 0.6 1 0.6 1
Coconut shell charcoal 0.2 0.6 1 0.6 1
Fish meal 2
Total Weight 12.65 31.95 53.25 31.95 53.25
Wet Ingredients (in milliliters (mL))
FPJ (high protein) 200 600 1,000 600 1,000
FPJ (multi-vitamins) 125 375 625 375 625
FPJ (medicinal) 75 225 375 225 375
FAA/KAA 250 750 1,250 750 1,250
FFJ 150 450 750 450 750
LABS 100 300 500 300 500
OHN 100 300 500 300 500
Ca PO4 375 625
Ca 375 625
Total Volume 1,000 3,000 5,000 3,000 5,000
Instructions

1. Mix all wet ingredients together.

2. Mix wet ingredients with 10% of rice brand first, making sure it is evenly mixed and there are no lumps.

3. Mix the remaining wet ingredients and dry ingredients into the mixture.

4. Store in a large plastic bag (close bag with tie and leave only a little bit of air in the bag) or a large container with a lid.

5. Let ferment for 3 days before feeding to chickens.

* Can store in dry cool place sealed well without air in it for 1 month.

Notes
Age of Chickens 4-14 days old 15-30 days old 30-60 days old 15-30 days old 30-60 days old
Amount to feed (per chicken per day) 250g 500-750g 750-1,000g 500-750g 750-1,000g
Will feed approximately 2 chickens for this many days: 25 26 30 26 30
* Copra meal = dried coconut meat.
** Fermented coconut meat = the squeezed coconut meat from making VCO is fermented for 2-3 days.
*** Termite soil - use healthy garden soil or 1 month old compost pile or IMO-5 if no termite soil is available.
**** Fish meal – when you make FAA, don’t throw away the fish meat, instead, dry it and make it into fish meal for your feeds.
Some farmers chooses to incorporate some commercial feed: 2 parts commercial feed, 3 parts red soil (insect rich soil), 3 parts chopped leaves/vegetables, 1 part rice bran (or crushed corn, soybean meal, crushed fish, crushed snail shell, humus, or burnt rice husk), 1 part FPJ and LABS. Mix all ingredients and ferment for 24 hours prior to feeding.

13.E Water and Water Troughs

Natural Farming chickens have a special drink formula to help keep them from getting sick and to help digest their food better.

  • For up to 7 days old chicks: 4 liters of water, 2ml of VCO, 2ml of TPJ (oregano, lemongrass, and mint, or turmeric, oregano, and guava leaves), and 20ml OHN.
  • For 8 to 14 days old chicks: 4 liters of water, 5ml of TPJ, 20ml OHN.
  • For 15 to 45 days old chicks: 4 liters of water, 5ml TPJ
  • For older than 45 days:they are free range and should get water with some TPJ in it.

Water troughs should be made in a way that allow chickens to drink only one at a time (see figure below). The size of the holes should be appropriate for their age and size.Make sure the holes are angled away from the chickens so they will not get water onto their chest.One common problem: When chicks drink, they face down and then they lift their head to face the sky. When they lift their head, the water falFor 15 to 45 days old chicks:ls from their beaks onto their body and they get wet. When their tummy gets cold, they can get sick. This can lead to diarrhea and toxin diseases. You can avoid this problem by adding pebbles to the water so the chicks can’t get their whole beak or head in the water feeder. Having individual holes will also prevent fighting. It is essential to have constant, clean water available.

PVC Pipe or bamboo can be used to create water troughs:

  • For 2-7 days old chicks, use 30mm PVC pipes/bamboo with 20mm diameter holes
  • For 8-14 days old chicks, use 50mm PVC pipes/bamboo with 35mm diameter holes
  • For older than 15 days, use 100mm PVC pipes/bamboo with 85mm diameter holes

Another way of making water or feeding troughs:

13.F Nesting Boxes

There are many good designs that can be used for hens to lay their eggs. The basic characteristics, no matter which design you choose, is:

1) The box needs to have a thick soft lining like straw or shredded paper or wood shavings.
2) It should be dark for privacy. Use a cloth to prevent light from coming in at the top.
3) The boxes should protect the nests from getting wet but have good air flow. Wet, cold or disturbed eggs won’t hatch.
4) Either provide housing or a fenced area to protect the hens and eggs from other animals.
5) The design allows for enough spaces for all the birds. Overcrowded areas can stress the hens and they will not lay as many eggs.

If you plan on collecting eggs, then collect them every day. This will help the chickens to lay more eggs.
If you plan on allowing the chickens to incubate their eggs to hatching, then the nesting box should be sectioned off, allowing only one chicken and her eggs per section, for safety and privacy. The eggs will hatch after 21 days. Never touch eggs that you want to hatch.
For eggs to get fertilized for hatching, and for a stress free pen, the ratio should be 1 male (rooster) to every 10 females (hens). This will reduce a significant amount of stress, which will prevent damage caused by pecking.
When roosters, are ready to mate, he will dance and try to get the attention of the hens. He will call the hen and then feed her with food and lead her to himself. In general the rooster is ready to mate at 20-24 weeks old and the hen is ready to begin laying eggs at 18-20 weeks old.
One example of a nesting box (this design is good for natural incubation of eggs.)

If you plan on selling eggs instead of incubating them, a better design is the “roll-away” design. The advantages for this design are:

  • The eggs roll-away to a safe place so the hens will not get an opportunity to peck at them.
  • If you don’t collect the eggs every single day, it is ok because they are safe from the hens incubating them.
  • Since the eggs roll-away, the hens are encouraged to continue to lay eggs.

Natural Farming

YOU TOO CAN LEARN TO BECOME A NATURAL FARMER

We offer hands on training at our demonstration farm in Ben Tre, internships, and consulting.

Natural Farming Vietnam envisions many Business for Transformation locations around the country where Christian farmers will model Natural Farming Technology, model godly Christian stewardship; model the “abundant life” that can be had with diligence and dependence on God. We envision these Christian farmers being a resource and a leader to their surrounding community, both as Natural Farming experts, and as spiritual guides.

GO TO WORKSHOP